Get Started with myTaxExpress
Get started with the user manual if you are new to myTaxExpress.
You can also find out more help topics, information and videos about the software and services by searching our FAQs.
Installation and Updates
Install myTaxExpress
Since myTaxExpress is a desktop application, please download one of the T2Express software installers from our Download Center first. Make sure you download an appropriate version of the software.
For Windows, double-click the installer to launch the setup wizard. Follow on-screen instructions to complete the installation process. You can watch this short video about the process.
For Mac computers, please follow the instructions on this FAQ page.
Software updates
For a particular version, we may release several updates for the latest CRA changes or bug fixes. We will announce the latest release date on our website. You can check the release time within the software by the Help > About myTaxExpress menu or the Help > About T2Express menu to verify if it is the latest version.
On Windows computer
Please read the FAQ page: How to Install myTaxExpress (Windows)?
On Mac computer
Please read the FAQ page: How to setup myTaxExpress (2019 and prior versions) on Mac computer?
Java Runtime Environment (JRE)
JRE is only required if you want to generate printable tax form (.pdf) files locally on your own machine for myTaxExpress software prior to the year 2009.
JRE is a free software package. There are two ways to get JRE setup files:
- Get JRE setup file from JRE-bundled myTaxExpress installer. After you installed JRE-bundled myTaxExpress, you will see myTaxExpress installation directory expands like the following:
- Download the Java SE package from Oracle Java Archive Website.
Double-click the setup file to install JRE on your machine.
Retrieve a license key
Retrieve a license key online
- Launch myTaxExpress or T2Express software, click the License/Help > Retrieve License Key Online… menu or the Help/License > Retrieve license key online menu.
- A Retrieve License Key Online window will pop up. Enter your payment email address and verification code provided in the license instruction email. Click the Next button or the Retrieve License Key Online button to complete the process.

You can find more information on the FAQ page: How to retrieve license key online?
Install a license key manually
- Launch myTaxExpress or T2Express software, click the License/Help > Install License Key Manually... menu or the Help/License > Install license key manually menu.
- A Manual License Key Installation window will pop up.
- In older years software, click the Generate PIN Email button. A notepad window will show up with a license PIN bound to the installation. Please manually copy and paste the PIN to an email and send it to our contact email.
- In newer years software, click the Send License Pin to myTaxExpress button. Enter your payment email address in the new field, an email will be sent to us automatically. A license key will be issued with the PIN. Please copy and paste the license key into the License key field to complete the process.

Preparing returns in myTaxExpress
Create new return
After launching myTaxExpress software, follow the following steps to create a new return.
- Click the Start > Create new tax return… menu or the New Return icon in the Quick Toolbars.

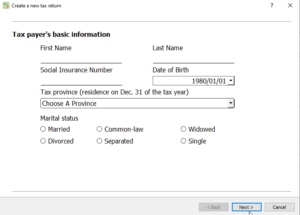
- A New tax return window shows up asking for basic personal information. Please verify Social Insurance Number and Marital Status fields before clicking the Next button. You won’t be able to change these fields unless you create a new return from scatch.
- You can fill some optional information in next couple windows, e.g. Dependant, spouse or common forms.
- Finally the new return file is created and opened in main interface of the software.
myTaxExpress Interface
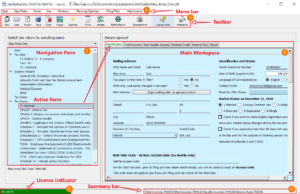
Menu bar: contains all commands you can use in the software, e.g., add/remove forms and slips, validate return, license installation etc.
Toolbar: quick access to some common commands, e.g. new return, validate, NETFILE/EFILE, Preference, etc.
Navigation Pane: List all slips/forms in the return. Select different slips or forms to work.
Main Workspace: When a form or slip is selected on the left Navigation Pane, the content of such form or slip is displayed here.
License Indicator: Whether the current software is licensed or not.
Summary Bar: The summary of the current return for Total Income/Taxable Income and Refund/Balance Due.
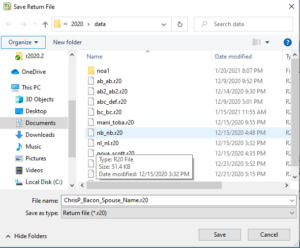
Save a return
You can save the return with the Start > Save Return File menu or Save (Save Now) icon in the Toolbar in the software.
The software saves the file with a default name and a default folder location configured in the Preference settings in the software. You can pick a filename you’d like, any folder on your computer. Click the Save button to save the return file.
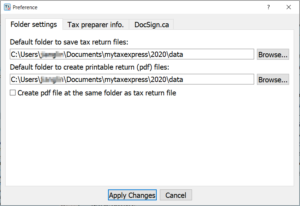
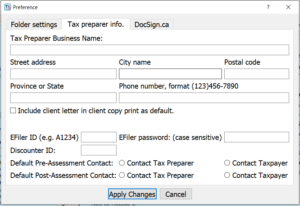
Preference Configuration
You can change default settings in software by accessing the Start > Preference menu or the Preference icon in the Toolbar.
Read more on How to change EFiler ID and password FAQ page.
Open an existing return
Click the Start > Open Existing Tax Return… menu or the Start > Open Return menu or the Open (Open Return) icon in the Toolbar. Choose the return file you’ve saved last time, click the Open button to open the file.
Add/Remove Tax Slip
There are two ways to add or remove tax slips in the software.
- Use the Slips/Notes menu in the software.
- Tax Slips are grouped and listed in the left Navigation Pane (tree view) of the software. Right-click on the Tax Slips node to bring up the context menu to add a slip or select a slip to remove it.
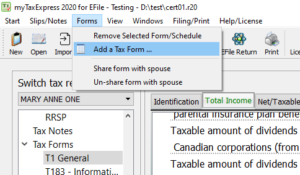
Add tax form
There are two ways to add tax forms in the software.
- Sometimes a form can be added automatically. When you try to input field that needs another tax form to support, a dialog box will pop up, asking you if you want to work on that form. Click ‘yes’ button, you will be brought to new tax form. For example, when you try to type in field 121 for interest income in T1 Form, you will be prompted to include Schedule 4.
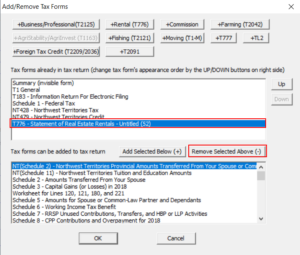
- The other way is to add new tax form manually. Click the Forms | Add/Remove other tax forms menu or click the +/-Forms icon in the toolbar. A Add/Remove Tax Forms window shows up. You can see all the available tax forms at the bottom, all the current used tax forms are on the top. Double click the tax form you want to add from the bottom. You can also click arrow button on the dialog to add tax form.
Remove tax form
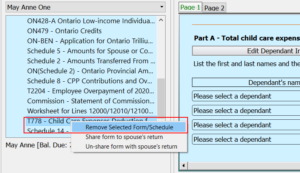
When a form is selected in the left Navigation Pane of the software, you can use the Forms > Remove Selected Form/Schdule menu to remove it. You can also right-click the form on the left Navigation Pane, choose the Remove Selected Form/Schedule menu option to remove it.
You can use the Forms > Add/Remove other tax forms menu to open the Add/Remove Tax Forms window. In the window, select a form and click the Remove Selected Above (-) button to remove it.
Coupled Return
Coupled return means two returns prepared in one tax file. In coupled-return mode, spouse’s tax data is cross-referenced automatically and is easier to share some forms or slips as well. Read more information on What’s a coupled return? FAQ page.
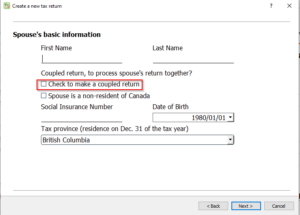
Create a coupled return
From tax year 2003, you can create a coupled return with your spouse by selecting an option when creating a new return, as shown in the screenshots below.
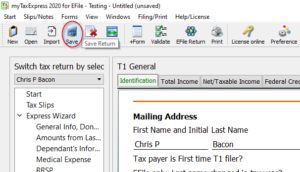
Switch tax return
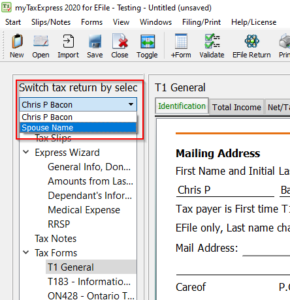
When preparing a spouse’s tax data, you can switch the tax return to the other.
In newer version of myTaxExpress you can switch between returns by clicking on the “Switch tax return by selecting name” drop down list. Then click on the name of the person whose return you want to switch to.
In older version of the software, you can switch tax return to your spouse’s by the list box labelled as “tax return for”, under the title bar. By finishing both of your tax return, spousal tax information are updated in each other’s tax return automatically.
NETFILE returns
Read more on the FAQ page: How to send netfile to CRA?